Guide
Turn HTML slides into a PDF with one slide per page
Updated · takushio2525 · 日本語
Sooner or later you need a PDF of those AI-generated HTML slides, to hand in, attach to an email or print. But open the deck in a browser, hit Print, choose Save as PDF, and the result is usually a mess: slides split across pages, backgrounds turn white.
This guide first explains why that happens, then shows how to get one slide per page at the slide’s real size with chamfer, how to share a presentation-ready HTML file instead of a PDF, and what to put in a print stylesheet if you would rather fix the HTML yourself.
What happens when you print straight from the browser
Print HTML slides from the browser and save them as a PDF, and you will often see one or more of these:
- A slide is cut off partway down the page and continues on the next one.
- Background colors and images disappear, leaving text on white.
- Wide slides are shrunk to fit a portrait A4 or Letter page, with big empty margins above and below.
- Only the slide currently on screen gets printed (decks that switch slides with JavaScript).
Why it happens
Browser printing simply slices the whole page into paper-sized chunks from top to bottom. HTML has no built-in notion of “this is one slide”, so unless the CSS asks for a page break at each slide boundary (break-after: page), the cuts land wherever the paper ends.
The paper size comes from the CSS @page rule. Without one, the browser uses the paper picked in the print dialog (usually portrait A4 or Letter), and wide slides are scaled down until they fit its width.
Backgrounds vanish because browsers skip background colors and images by default to save ink. Setting print-color-adjust: exact in CSS, or turning on “Background graphics” in the print dialog’s settings, brings them back.
Decks such as reveal.js hide every slide except the current one on screen. They are printed with that state too, so only the visible slide comes out.
One slide per page with chamfer
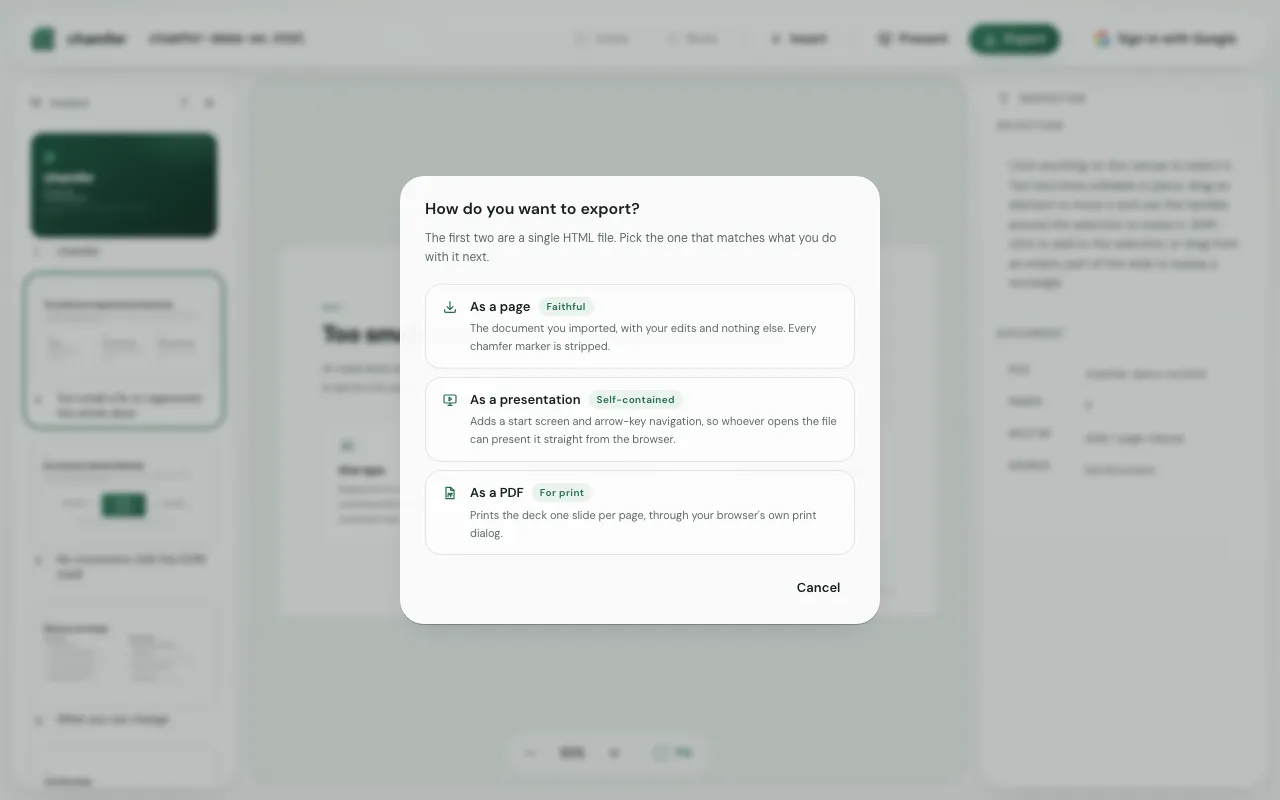
chamfer’s As a PDF adds the settings above to a print-only copy of your deck and hands that copy to the browser’s print dialog. Your original HTML is not changed.
- Open chamfer.takushio2525.com and drop your HTML file onto the page (or the whole folder, if the CSS and images are separate files). Make any fixes first.
- Press Export in the toolbar and choose As a PDF.
- A Saving as PDF note appears. Press Open the print dialog.
- In the print dialog, set Destination to “Save as PDF” (in Chrome), press Save and choose where to put the file.
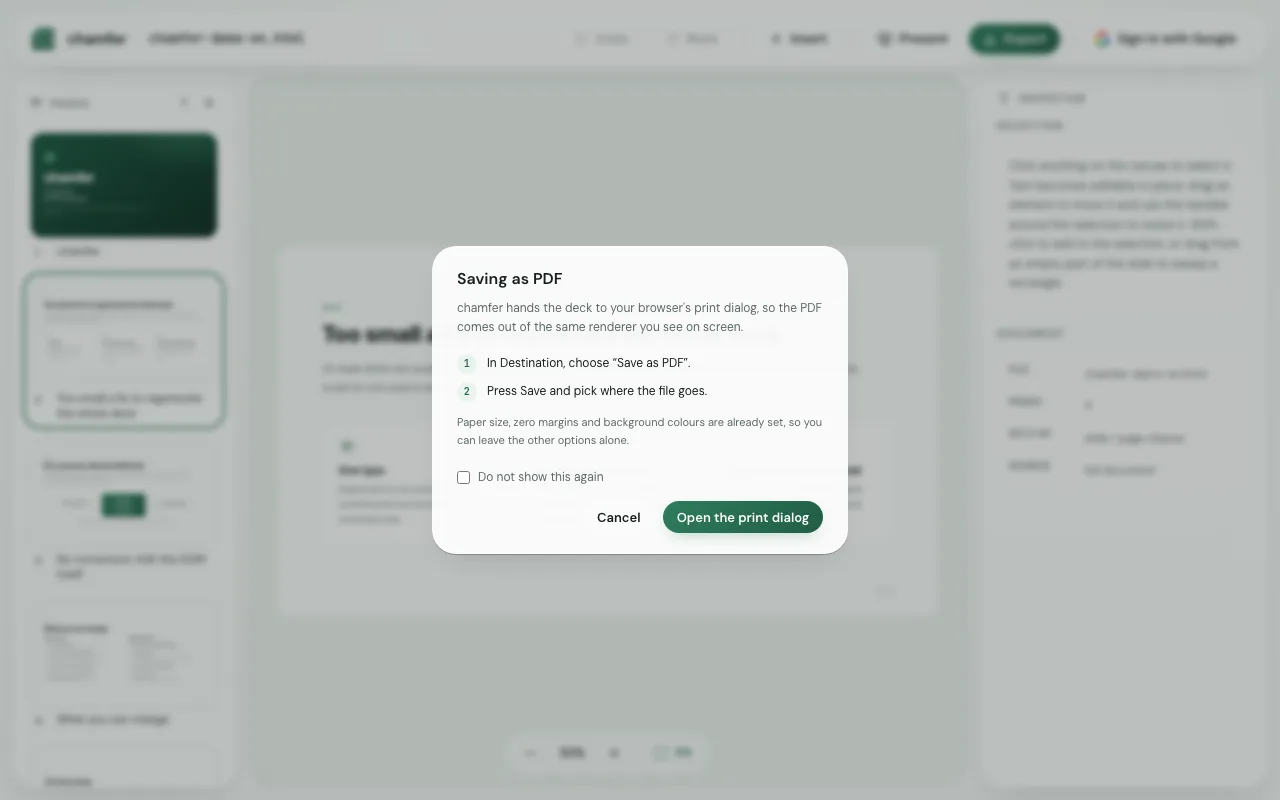
chamfer has already set the paper size, zero margins and background printing, so you can leave the other print settings alone. The PDF is produced by your browser’s own print feature, so the file is not sent anywhere. Text stays text rather than turning into an image: you can select and search it in the PDF, and it stays sharp when you zoom in.
What chamfer adds for printing
- The paper is set to the slide’s real size. chamfer reads the slide width and height from your CSS (for example 1280×720px) and uses them as the page size. Multi-page decks with no size in the CSS get 1280×720px, and single documents with no page breaks (landing pages, reports) are flowed onto portrait A4.
- A page break after every slide, with no blank page after the last one.
- Background colors and images are printed for every element.
- Decks that show one slide at a time on screen (reveal.js and the like) are printed with every slide. The deck’s scripts stay paused, so nothing hides the slides again right before printing.
- Slides whose height is tied to the screen height (
100vh) have no fixed height on paper and would split across two pages, so chamfer sizes each slide box to match the page. - chamfer’s own interface, such as the selection frame and buttons, is left out of the PDF.
Troubleshooting
Content spills onto the next page
If a slide has a fixed width and height and its content overflows the slide box, the overflow is printed on the next page. Select the overflowing element in chamfer, reduce its font size or adjust its position and size, then export again.
It is not one slide per page
Changing Scale, Margins or the paper size in the print dialog can conflict with chamfer’s settings. Keep the defaults and save.
The background comes out white
chamfer asks for backgrounds to be printed, but if they still disappear, turn on “Background graphics” in the print dialog’s settings.
Images or fonts are missing
The deck probably refers to CSS or images outside the HTML file and you opened only the HTML. Open the whole folder and export again (see when the CSS and images are separate files).
Share a presentation-ready HTML file instead of a PDF
If the goal is to put the slides on a screen, you can skip the PDF and share HTML. chamfer’s As a presentation exports a single HTML file with a start screen, arrow-key and click navigation, and full screen built in. The recipient just opens it in a browser to present; they do not need chamfer.
| Aspect | Presentation HTML | |
|---|---|---|
| Opens in | Any PDF viewer, on any device | A web browser |
| Animations | None | The ones added in chamfer play on each click |
| Controls | Whatever the viewer offers | → or Space to advance, ← to go back, F for full screen, Esc to leave |
| Printing | As is | Prints one slide per page |
| Best for | Submitting, sharing, printing on paper | Presenting, or having someone else project it |
Opened where JavaScript does not run, the navigation simply does not appear and the slides read as an ordinary page stacked top to bottom. Open the exported presentation in chamfer again and the bundled navigation is removed, giving you back the original deck to edit.
Writing your own print CSS
You can also solve this without chamfer by adding print CSS to the HTML. There are four things to get right: make the paper the size of a slide, break the page after every slide, print backgrounds, and set the slides’ margins to 0. Here is an example for slides marked up as <section class="slide"> at 1280×720px:
@page {
  size: 1280px 720px; /* slide width and height */
  margin: 0;
}

@media print {
  html,
  body {
    margin: 0;
    padding: 0;
  }
  .slide {
    width: 1280px;
    height: 720px;
    margin: 0; /* remove vertical margins: margins after a page break are kept */
    border-radius: 0; /* rounded corners would show the page color behind them */
    overflow: hidden;
    break-after: page; /* new page after every slide */
  }
  .slide:last-child {
    break-after: auto; /* no blank page after the last slide */
  }
  * {
    -webkit-print-color-adjust: exact;
    print-color-adjust: exact; /* print background colors and images too */
  }
}
The margin is the part people miss. AI-generated slides often carry vertical margins such as margin: 40px auto. Margins before a forced page break (break-after: page) are truncated to zero, but margins after it are kept at the top of the next page (CSS Fragmentation Module Level 3, section 5.2). Each slide then starts lower than the top of its page, the bottom of the slide no longer fits, and the overflow is pushed onto another page, so five slides become ten pages. Set the margins of the slides and of body to 0 when printing.
If the deck hides slides with JavaScript, show them again when printing. If your slides lay out their content with flex or grid, use that value instead of block.
@media print {
  .slide {
    display: block !important; /* also print slides hidden by JavaScript */
  }
}
Slide class names differ between decks (.slide, .page, section and so on), so check yours in the browser’s developer tools first. If other elements follow the last slide, :last-child will not match and you may get one blank page at the end. Keep anything that should not affect the on-screen look inside @media print.